Advanced Operating Systems (LV 7680)
Hardkernel Odroid-C2
The Odroid-C2 low-cost development platform, see the specifications on the hardkernel website.
Contents
- Manuals
- The boot process
- Kit contents
- Setting up your host
- Setting up an Odroid-C2
- How to use - what is really happening
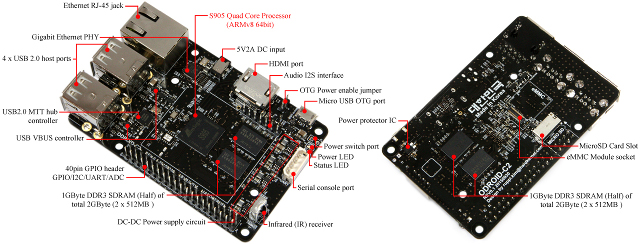
The Odroid-C2 has multiple components. The development board itself contains a system-on-chip (SOC), the Amlogic S905, 2GiB RAM, and other devices including ethernet, SD card reader, eMMC module socket, infrared (IR) sensor, USB ports and LEDs.

The SOC itself, the Amlogic S905, contains an quad-core ARMv8, Cortex-A53 CPU and other devices including timers, watchdog timers, GPU, DMA controllers etc.
Finally, the CPU, a Cortex-A53, has four cores, caches, and other architectural features including the coprocessor and arm generic timers.
Manuals
(also see the Resources menu on the left)
- Architecture: ARMv8 Architecture Reference Manual
- CPU: Cortex A53 Technical Reference Manual
- SOC: Amlogic s905 Datasheet
- Development board: Odroid-C2 Schematic
The boot process
The ODROID-c2 kits are brand new, and need configuring. By default, when plugged in the board will boot into Linux, which is loaded onto an eMMC Flash storage card by U-Boot, a popular, open-source first-stage boot loader. U-Boot's primary role is to enable peripherals and secondary storage in order to load and boot a complete operating system from a variety storage media.
Once U-Boot has loaded, it will wait a few seconds before executing the default boot command. This is your chance to stop the boot process and enter the U-Boot prompt. Once at the U-Boot prompt, type help to view a list of commands or print to display a list of environment variables.
Key environment variables:
bootcmd: The boot command that will be executed when the boot delay expires.bootdelay: The number of seconds to wait before executing the default boot command.ipaddr: The IP address of the development board. This should be set to 192.168.237.<20+ODROID-Number>.serverip: The IP address of server hosting remote boot images. This should be set to 192.168.237.1.
If in doubt, you can restore the default environment by typing run clearenv.
Key U-Boot commands:
setenv: Set the value of an environment variable.run: Execute the contents of an environment variable.tftpboot: Download a file from the server.go: Start executing at ADDR.md: Display the contents of physical memory.mm: Modify the contents of physical memory.
Once you have finished, you can resume the auto boot process by running run bootcmd
Kit contents
The kit given out for AOS contains the following items:
- An Odroid-C2 (in a plastic case).
- An eMMC module with U-boot and Linux pre-flashed (already installed onto the Odroid-C2).
- Micro-USB power adapter.
- UART adapter (installed) + Micro-USB to USB cable.
- USB-Ethernet NIC
- CAT5 Ethernet cable.
Setting up your host
The lab machines already have the required software installed. See milestone 0 for details.
Your host machine will require certain software and drivers to talk to the Odroid-C2. This is mostly machine specific.
Setting up an Odroid-C2
Use the USB-microusb to connect to the UART adapter (the wires poking out the hole int the case), which allows output over serial device.
You will also need a network connection between the host computer and the Odroid-C2 for downloading OS images, communicating with NFS file systems and to provide a console over LAN. The lab computers are equipped with two physical network interfaces, one of which is connected to the campus network, while the other is local to the lab. In the local lab network, the each ODROID is allocated its own IP adress, which is 192.168.237.<20+ODROID-Number>. If you use your own computer, most likely a laptop with wireless LAN and ethernet, you can use the spare ethernet to connect to the ODROID. If your computer does not have a spare ethernet port, you should use the USB-Ethernet NIC that is provided in the kit. In both cases, the ethernet NIC should be configured for a static IP address 192.168.168.1. If you prefer to connect the ODROID to your own private network at home, chances are you know what you are doing and which IP address to assign to it. In the remaining documentation, we assume that the ODROID can be reached via 192.168.168.1.
Once the Odroid-C2 is connected to your development machine you should launch the two consoles that connect you to its output. Run picocom -b 115200 /dev/ttyUSB0 in one console window and nc -up 26719 192.168.168.1 26719 in the other.
You may be required to change the arguments for picocom. On Linux, use dmesg to work out which port the USB to serial converter has been attached to (its usually /dev/ttyUSB0). Then pass that to picocom. Note: on some systems, the braille Terminal driver brtty may inadvertedly grab the serial device, causing /dev/ttyUSB to vanish. If that happens, uninstall the brtty package.
Plug in the power cable for the Odroid-C2 to reboot. When picocom is connected to the serial port, you should see some output from U-Boot.
How to use - what is really happening
A brief description of the development cycle can be found in Milestone 0. A lot is happening under the covers to allow you to easily develop an operating system:
Plug in the Odroid-C2 and power it on.
On lab machines this generates a hotplug event on the host's USB bus and results in the creation of the tty device.
In a terminal, launch picocom
when picocom launches it opens the tty device.
In another terminal, launch netcat,
nc -up 26719 192.168.168.2 26719.Not magical, nothing will happen though until you send something with libserial. Make your changes, (hint: learn cscope).
Build and run using build$ ninja && ../reset.sh.
A lot is happening here under the covers,
ninjawill first build your OS, generating a binary boot image. Once the build is complete, make copies theimages/sos-image-arm-odroidc2file to yourtftpbootdirectory. Then, a reset signal is sent over serial, which causes the kernel to reboot the device. When the device reboots,tftpwill fetch the newly built image over tftp and execute the image.

