Advanced Operating Systems (LV 7680)
SOS framework
This document describes the provided SOS framework. This is provided to make it easier for you to get started with the project. The source code itself should be reasonably well commented, and you should ensure that you understand the provided source code.
Build system & Project Structure
Note that the structure of the project and the build system are intimately linked. Although you are free to change the build system and layout of the project it is discouraged for the following reasons:
- Patches, and additional libraries might be provided through the course,
- You will be required to write additional documentation about your layout and build system if it is changed,
- Tutors won't spend time debugging your Makefile if you have extensively changed it.
Starting configuration
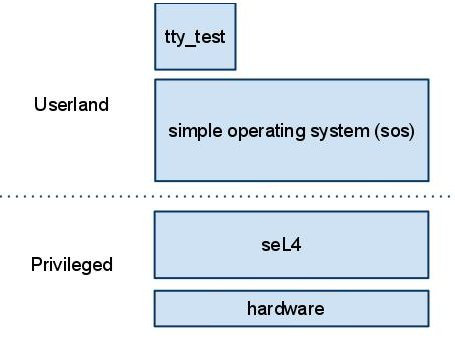
This section describes each part of the system as it is when you get the code. The image below shows how the system is set up.

Figure 1: System startup configuration diagram
- hardware: This is the development board that you will be using during the project. Documentation can be found in the wiki.
- seL4: This is the microkernel you will be developing your project on. You have the sources, but will not have dive into these. You also will not be using most of the interface directly, but you should still understand all of the basic concepts. Documentation is here.
- sos: This is the stub operating system that you will build your project from. The starting configuration has one thread in one address space and contains functional networking libraries.
- tty_test: This is the first application that
soswill run.
Make and the Kbuild build system
We have provided a fairly comprehensive build system for you, however
you will need to edit the Makefiles and Kconfig/Kbuild files
throughout your project as you add new libraries and applications.
For the most part you should be able to work out how to alter them.
The root Makefile builds all of the separate applications as separate
binaries. It then uses a program called cpio to link all of these
binaries into one image, bootimg.bin. All of the other Makefiles are
used to specify source and header file locations for each library or
application, which are then used in the common.mk general purpose Makefile.
The Kbuild/Kconfig files are used to manage dependencies, select
libraries and applications for building and adjust build options.
Whenever you change one of these files you need to make menuconfig to
pick up the changes. This will open a dialogue that allows you to
configure your project.
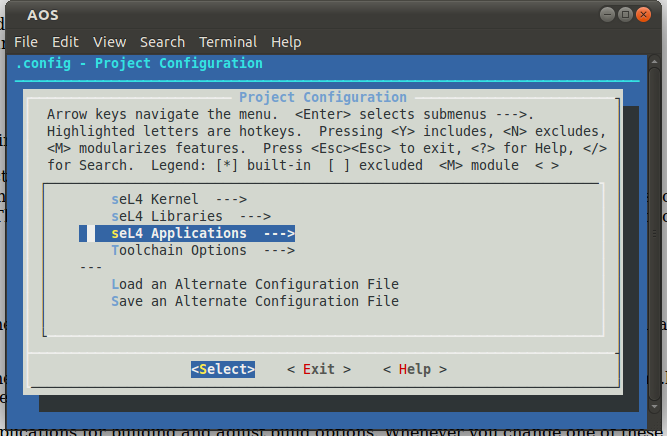
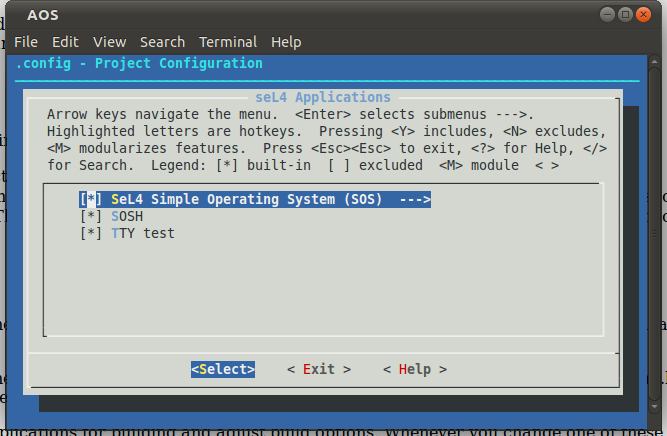
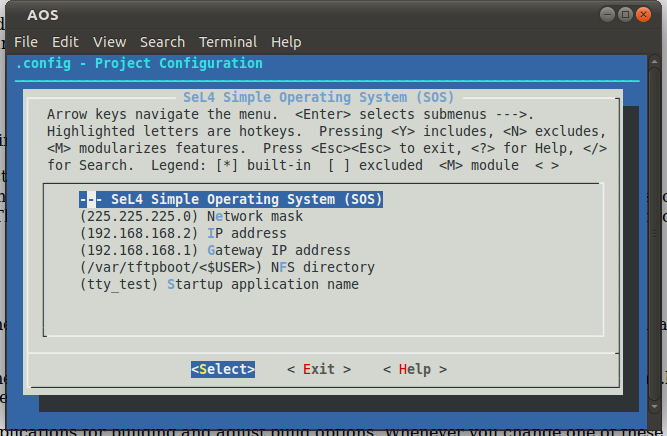
The network configuration of SOS is setup via Kconfig. To change these
settings, follow the menu options as shown in the figures below.


- Network mask: This configuration option will set the network mask. In most cases, this will be set to 255.255.255.0.
- IP address: This configuration option will set the IP address of the devboard. This option is dependant on the configuration of the host computer. Note: For the lab environment in HSRM, the address used is your host computer's address + 199.100.100.240, e.g. if you are using computer ti209, your target's IP address should be 199.100.100.249. If you use a crossed network cable to connect your target directly, e.g., to your private laptop, the address would probably be 192.168.168.2.
- Gateway IP address: This configuration option sets the destination IP address of network packets sent from the Sabre. This option is dependant on the configuration of the host computer, though usually 199.100.100.1 or 192.168.168.1.
- NFS directory: This configuration option can be used to set an alternate NFS directory to mount in case the default mount point was not found.
- Startup application name: Once SOS is initialised, SOS will proceed to load an initial process from its cpio image. This configuration options provides the name of the application to load. In later milestones, this option will need to be changed to sosh or to the name of a testing application that you may have created.
Alternatively, the configuration can be modified manually with:
 $ cd <aos-dir>
 $ vim .config
 $ make oldconfig
Applications
You have been provided with three applications; sos, tty_out and sosh.
All applications are placed in the apps directory. See milestone 7 for
details on how to add a new application.
SOS
Most of the code you will write will be in the sos directory. Currently
there is a very minimal operating system implemented, which should help
get you started. The following section presents a brief overview of each
file. Find more details in the source!
main.c
This file is the driver of the minimal stub code you have been
provided. The interesting thing here is the startup procedure,
which should be fairly easy to follow. On startup the following
happens:
- Initialisation of the untyped memory management subsystem.
- Initialisation of the capability space management subsystem.
- Creation and binding of the synchronous and asynchronous endpoints that will be used for receiving interrupts and user application IPC
- Initialisation of the network drivers and libraries.
- Spawn a thread in a new address space (the
tty_testapplication). - Start the interrupt, fault and IPC handling loop.
elf.c, elf.h: A very basic (stub) elf loading implementation.
mapping.c, mapping.h: Provides a helper functions which can be used to map frames into the virtual memory space of SOS. Kernel page table objects are created as they are needed, however, the allocation of the frame to be mapped is left to the caller. Note: The current code "leaks" the page tables, something you will need to fix in later milestones.
dma.c dma.h: These files handles DMA for the network driver.
network.c, network.h:These files are responsible for setting up the network device drivers and initialising hardware for you. It exports the single network_init function, which you should ensure is called on startup.
vmem_layout.h: Defines the layout of virtual memory.
ut_manager/ut.c, ut_manager/ut.h, ut_manager/ut_allocator.c: These files implement the untyped memory management subsystem.
The first stage of initialisation involves a call to ut_table_init.
This function arranges untyped memory objects into a linear space.
Untyped memory can then be referenced by a single address rather than
the tuple of {untyped capability, offset}. Once initialised, ut_steal_mem
can be used to reserve memory, however, this memory can never be freed.
The second stage of initialisation involves a call to ut_allocator_init.
This function initialises a bit field driven buddy allocator system which
allows calls to ut_alloc and ut_free to reserve and free untyped memory
respectively.
ut_alloc and ut_free both require sizebits as a parameter. The
memory reserved or freed by these calls will have a size of 2^sizebits^.
Valid values for sizebits are:
- 14: 16KB kernel page directory objects and 16KB kernel capability nodes.
- 12: 4KB kernel frame objects.
- 10: 1KB kernel page table objects.
- 9: 512B kernel TCB objects.
- 4: 16B kernel endpoint objects.
Sizes 14, 12 and 10 are each implemented as a bit field that divides all of managed memory into partitions of the corresponding size. A bit with a value of 0 means that the corresponding partition is available and can be allocated. A bit with a value of 1 means that the corresponding partition is unavailable. A partition may be unavailable either because the partition has already been allocated or because the partition is not currently being managed by the bitfield.
In the example shown in the image below, the 2^14^ size partitions marked as A and B may be allocated as 4 2^12^B frames or they may be allocated to objects of an alternate size. The 2^14^ size partition marked with C is clearly reserved for 2^12^B frames, two of which have already been allocated. The 2^14^ partition marked with D is currently available and is not managed by the 2^12^ bitfield. It may be used as a 2^14^ object or it may be used to provide an available memory region to a bit field that manages an alternate size.

When allocating from a bit field that has no bits marked as available, a 2^14^B memory region is requested. The value of the returned address is then used to mark corresponding partitions as available. One of these newly available partitions will be marked as unavailable and the corresponding address is returned to the caller.
When freeing a memory region, the corresponding partition in the appropriate bitfield is marked as available. If enough partitions in this bitfield are marked as avaiable, the memory region will be returned back to the 2^14^ pool for recycling.
Sizes 9 and 4 are implemented in a similar way except that, in an effort to reduce book keeping overhead, a linked list of bit fields is maintained rather than maintaining a bit field to address all of allocator managed memory.
ut_manager/bitfield.c, ut_manager/bitfield.h Provides a generic bitfield implementation for the untyped memory management subsystem.
sys/debug.c, sys/debug.h Defines a macro for debug printing that
prints out a message if the given debug level is strictly below an
externally defined verbosity level #define verbose X.
sys/sys_*.c These files define various functions for the standard
C library to call when called from within SOS. For instance, it provides
the implementation of sys_brk used within SOS.
sys/panic.c, sys/panic.h Defines a macro for panic that prints out the file and location where the panic occurred.
Libraries
All of the libraries are provided in the libs directory. Libraries
depend on each other, so the Kconfig file in the root of each library
directory defines any dependencies.
In order to add a new library, you need to do the following:
- First create a directory libs/
. - Create a top level library Kconfig. libs/
/Kconfig. See libs/libserial/Makefile for a simple example. - Create a top level library Makefile. libs/
/Makefile. See libs/libserial/Makefile for a simple example. - Add your library to the Kconfig file.
- Use make menuconfig to select your library and include it in the build.
- Modify the build settings of the application that will use your library. This involves adding 'name' (with no lib prefix) to the LIBS list in the applications Makefile and modifying the applications Kconfig depends on line in to include your library.
So that you don't have to write everything from scratch, we provide you with some libraries to get you going. Some of the libraries are directly relevant to you, in that you will be implementing and extending them. Others are used by other components of the system, but you are free to investigate the source out of interest (or while debugging). All of the libraries are listed here with brief descriptions, in order of relevance to your project.
libs/libsos This is the library that applications use to interface with SOS. You will extend and implement the interfaces present over the course of the project.
libs/libserial This library provides functionality for serial over LAN driver in M0
libs/libclock This is the clock interface that you will implement in M1. Also contains useful constants.
libs/libsel4 Interfaces for interacting with sel4 directly. Also contains handy macros and error codes.
libs/libsel4cspace Capability space management library.
libs/libmuslc A fairly complete C library, most of which is unusable unless you choose to implement the required POSIX syscall support.
libs/libcpio A library for parsing the cpio archive that is linked to SOS. This archive will contain applications such as tty_test and sosh.
libs/libsel4elf A library for parsing ELF files.
libs/libnfs A simple NFS client.
libs/libsel4sync A basic synchronisation library for seL4. If you need synch primitives, this is where to look.
libs/elfloader Library for building the bootimage and loading up sel4.
libs/liblwip A light-weight IP stack.
libs/libethdrivers As the name suggests, this library contains the ethernet driver that you will be using.
libs/libplatsupport A library of drivers and helper routines for various platforms. The only parts of this library given to you are some clock drivers needed for the ethernet driver

